
A properly stretched canvas on a well-built frame will display and protect your work for years to come. Whether it’s a digital photo print on canvas, or you’re laying the groundwork for a new painting, this tutorial with video will help you prep your own DIY canvas in 5 easy steps.
Ready? Let’s get started, and if you want to skip ahead to the video, head straight to the bottom of the page.
1. LAY YOUR CANVAS

Arrange your canvas face-down on a flat, clean and dry surface. Place your assembled stretcher frame on top with the raised "canvas-edge" facing down. Make sure the frame is square by measuring diagonally in both directions . A properly-sized canvas will leave about 3-5 inches of canvas on each side, enough to cover the sides (depth) of the frame, plus about 2-3 inches of material to pull around the back. If you haven’t yet assembled your stretcher frame, start here for step-by-step instructions.
2. START YOUR CANVAS STAPLING IN THE CENTER

Pull your canvas tight to the center of each bar using canvas pliers and staple the canvas as shown. Use a staple gun with 3/8” (10mm) JT-21 staples for best results.
3. CONTINUE STAPLING
On each side, drive 3 more staples about 1 ½ inches apart on each side of the first staple. Pull the canvas to create an even tension while stapling.

Work from the center towards each corner, adding 3-5 staples at a time, stopping 6 inches before the end on what will be the top and bottom sides of the frame to leave room for your corner folds. Typically, the folds are located there so the sides of your canvas (which are most visible when hung) will be smooth.
4. FOLD YOUR CANVAS CORNERS
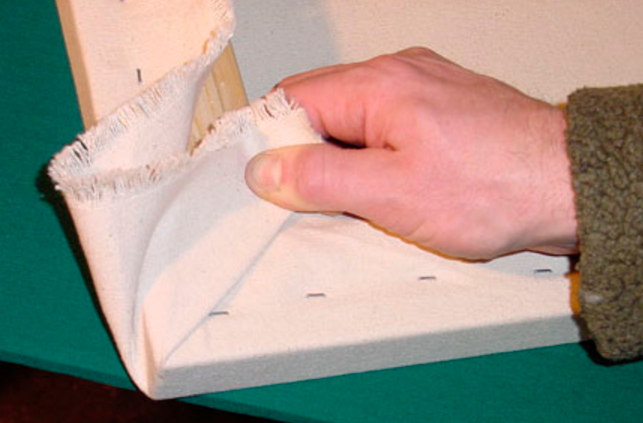
Add staples right to the very end on your side bars, then grab the corner of the canvas and pull directly in toward the inner corner of the frame. Adjust, if needed, so it pulls tight around the outer corner and lays flat on a 45-degree angle, as shown. Add a staple along this 45-degree edge.

Pull your remaining canvas tight and staple to the frame. Repeat on each corner. Your finished corners should look like this:
5. KEY YOUR CORNERS**
 **Note: If you are stretching unprimed cotton or linen canvas, wait to "key out" the frame until you have sized and/or primed the canvas and allowed it to fully dry. Applying these will cause the canvas to shrink when wet which will naturally tighten the canvas. Once these are dry, continue with the following instructions to achieve the desired tension.**
Slide the narrow end of the canvas keys into both slots in the frame corners and a single slot at each end of any braces. Tap in gently with a hammer to expand each joint equally, checking frequently until your canvas has the desired tension.
WATCH A PRO STRETCH A CANVAS, STEP-BY-STEP:
Video embed:
Looking for more?
- Learn how to choose the right stretcher bars for your canvas.
- Browse a wide selection of stretcher bars and canvas options.
- Get help stretching your canvas prints or paintings.